
Organizing Tickets for OPS Teams Part 2
Organizing Tickets for OPS Teams Part 2
In my previous article I laid out some of the ground work for how I setup my team’s workflow management. In this article I’ll go a little deeper, specifically around ticket types and my labelling process in order to get more data from our ticket work so that I can effectively manage the team.
Ticket Types
As previously mentioned, my team uses JIRA for ticket management. Any ticket system worth a damn will have some concept of ticket types so the lessons presented should still be applicable. I’ll be writing directly about my JIRA experience, so your mileage may vary.
The first thing when considering what ticket types to create is how I want to report on this data in the future. If I don’t care about the difference between a Defect and a User Story, there may not be much value in separating the two ticket types. With reporting in mind, I go about laying out the different ticket types I want as my first layer of reporting.
- ProdOps Tasks — This ticket type is designed for end users (developers, QA staff, etc) who need support from my team for something that is need in “quick” fashion. Quick might be minutes, it might be days but the important thing is that it can’t wait for the normal iteration planning process of my team to happen. This is interrupt driven work. As a result, the workflow for ProdOps tasks has these tickets skip over the backlog and land directly into the Input Queue.
- Stories — These are larger requests that are going to take time, planning and effort. They might come from customers (again, developers, QA staff, product owners etc) but they’re often generated from within our team. Stories are always capable of being scheduled and therefore go directly to the Backlog upon creation.
- Defects — When a piece of infrastructure or automation that my team supports isn’t working as intended but is not blocking a user’s ability to do their job, we mark this as a defect. An example might be that our automation does an unnecessary restart of the Sidekiq Service, which results in a longer environment creation process. It is a pain for sure, but the user will live. It’s still something we should address, hence the defect ticket. Defects go directly to the backlog.
- Incidents — When a problem is occurring, there’s no workaround and there’s a direct impact to a group of people’s ability to work, that’s considered an incident. An incident exists regardless of the environment it happens in. (No matter the environment, it’s always production for somebody) Incidents skip the backlog and go straight to the input queue. Incidents are often generated automatically via PagerDuty since all of our alerting happens through the Datadog/PagerDuty integration.
- Outage — When we have large system wide outages we create an outage ticket to track the specifics of the larger impact. Because incidents are generated by alerting, when there’s an outage we will often have multiple incident tickets that are all related to the same problem. The outage ticket allows us to relate all of those tickets to a master ticket, as well as use the outage ticket to track the specific timings and events of the larger incident. Outage tickets are generated manually at the declaration of an outage.
- Epics — I use epics to tie multiple stories into larger efforts. I also use epics as a way to communicate what the team is working on in a higher level fashion to my management. My boss doesn’t care that we’re working on moving away from the deprecated “run” module in Salt Stack. (That’s too low level) Leadership wants larger chunks of work to understand what’s happening on the team. Having an epic with a business level objective at its definition is much easier for leaders to follow and understand.
Each of these ticket types were created with two primary things in mind. * How do I want to report on tickets? * How do I want these tickets to behave as it relates to the backlog and input queue?
How do I want to report on tickets?
I create the ticket types based on how I want to report. ProdOps Task tickets were created to get an understanding of not only the demands that other teams are placing on my team but the urgency of those demands. This might be something material like “Need help with a new Jenkins Pipeline” to something routine like “New hire needs access to Kubernetes.” Having these types of requests separated into their own ticket type allows me to very easily create reports around them. (Even with JIRA’s horrible reporting abilities)
Stories and defects when compared to incidents and prodops tasks allow me to get a sense for how much planned work the team is doing versus work that bullies its way into the queue and demands our immediate attention.
Something to consider about ticket reporting. Reporting can be an inexact science. Much of it is subjective when you start looking at the details of a ticket. The thing to keep in mind with this sort of reporting is that we’re looking at the data for themes not for precision. Do I care that I had 3 tickets get categorized incorrectly as defects? Not when 60% of my tickets are defects. The 60% number (if true) helps to draw my focus. When it comes to reporting, look for a signal, but then validate that signal. Don’t just assume the data is accurate and start making changes. It’s just too difficult to keep the data completely accurate, so you should always look at your ticketing reports through that lens.
How do I want these tickets to behave as it relates to the backlog and input queue?
Tickets that are too urgent to go through the planning and prioritization process need to be made available to the team for work immediately. By creating those as separate ticket types, it’s easy for me to create a different workflow that allows these tickets to jump straight into the Input queue. I can also add functionality to flag these items or take other actions to raise their visibility to the team. But the ticket type drives my ability to handle them differently.
Different ticket types for end users to leverage also makes it much easier for them to interact with us as a team. Almost exclusively we tell our users to create their tickets as ProdOps Tasks. The majority of the time, they’re items that need to be addressed sooner rather than later. In the cases where their tickets actually can be scheduled we just convert the ticket to the appropriate ticket type (based on our reporting needs) and we move it to the backlog for the next planning meeting. This removes the anxiety of choosing the wrong ticket type from the user. Create it as a ProdOps Task and we’ll do the rest.
Ticket types can go a long way in helping you to create meaningful reports on the activity of your teams. It also gives you a way to slice your workload to see how different areas are impacted. The average time to close a ticket might be 14 days but then you find out that if you separate that by ticket type, the incident tickets are the outlier for resolution time. Maybe your team isn’t consistent about closing those particular ticket types for some reason. Or perhaps the automation that you use to resolve the tickets through monitoring isn’t setting the “Resolution” field on the ticket appropriately.
Sometimes though you want a level of reporting that goes beyond what ticket types allow for. This is where I use labels.
Using Labels for Reporting
Labels are pieces of metadata that you can add to tickets to give them a bit more description. The beautiful thing about labels (and metadata generally) is that they’re so flexible. The horrible thing about labels is that they’re so flexible.
The reporting on labels in JIRA isn’t the greatest, but the pain of pulling this data into a separate tool and figuring out the JIRA data model is much higher than just dealing with the reporting shortcomings, so here we are. When it comes to labels, relying on team members to always label tickets has varying levels of success. Some team members will be extremely diligent about it while others will be more lax. It’s good to have a process where you can validate that labels have been applied to tickets appropriately.
The issue I find with labels is that it can be difficult to know whether the label is just missing on a ticket or if that ticket doesn’t meet the criteria for the label. In order to combat this, I’ve designed my label strategy so that I understand what my label is trying to communicate and I ensure that the positive label (i.e., this ticket matches that criteria) has an opposite label, denoting that it doesn’t meat that criteria. For example, a label that I want all my tickets to have is whether the ticket was a PLANNED ticket, meaning the team decided when it would be done versus an UNPLANNED ticket, which had its schedule forced on us for one reason or another. Instead of just having a “PLANNED” label for those tickets, we also use an “UNPLANNED” label for the others. This way I can always know if a ticket was processed or not (for this criteria at least) because it should have one of these two labels.
Processing Tickets for Labelling
For the labels that I absolutely want to ensure every ticket has, I create filters to identify tickets that do not have those labels. For example, my planned/unplanned filter looks like this:
project = "Prod Ops Support" AND created >= startOfYear() AND (NOT labels in (UNPLANNED, PLANNED, TEST-TICKET) OR labels is EMPTY)This will give me a list of tickets that haven’t been labeled yet. Using the Bulk Change tool, I can quickly scan through the tickets and “check” the items that I considered UNPLANNED. With the Bulk Change Tool I can then select each ticket that I want to add the label to.
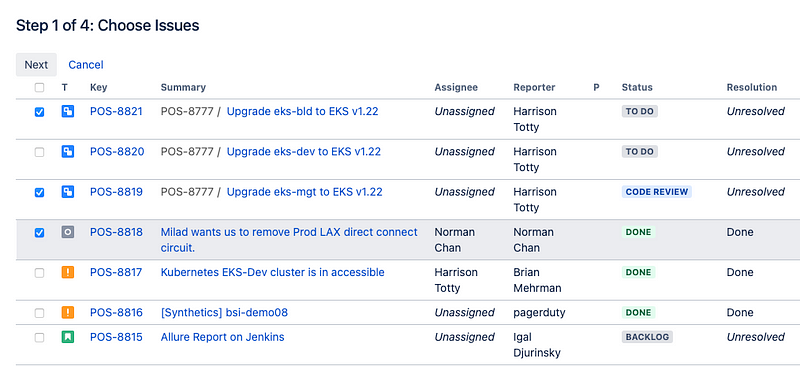
After going through the Bulk Edit wizard and adding the label the query should now return fewer results, since we’ve updated all of the UNPLANNED tickets. Now we can select all of the remaining tickets and add the PLANNED label to them. Repeat the same process with the Bulk Change tool and you’re good to go.
NOTE: Make sure you disable notifications for your bulk edit change. Or lots of people will be frustrated with you
I repeat this process for all label sets that I want to add. Each label set has a query similar to the one I used for PLANNED/UNPLANNED tickets which allows me to quickly identify tickets that need to be processed.
Another label pair I add is TOIL/VALUEADD. This identifies which tickets are work that we shouldn’t be doing as a team and need to automate or transition to another group. An example of TOIL work would be user creation.
All of this might sound like a lot of work, but I assure you I spend no more than 15 minutes per week doing this type of labeling work. I do it on Monday mornings every week in order to keep the volume relatively low. And again, the aim for me isn’t 100% accuracy, but to get the broad strokes so that I can see the signal start to bubble up.
Wrap Up
Now that I’ve explained my ticket types as well as my labeling process we can discuss the different types of dashboards that can be built in a future blog post.